Watch this scrolling video of actual Zephyr Thomas Home Improvement Jobs
Cheap Walkers Jerk Seasoning Razor Atv Polaris Decide Now !8!# Promotions Kitchenaid Slicer
Cheap Walkers Jerk Seasoning Razor Atv Polaris Decide Now !8!# Promotions Kitchenaid Slicer
Trip 5: Kona to Mauna Kea, Kaumana Cave and Hilo via the Saddle Road
Approximate minimum time start to finish (to see every site): 12 hours
From Kona take Highway 190 to Highway 200 in 45 minutes of driving. Saddle Road, which cuts between the "saddle" of Mauna Loa on the south and Mauna Kea to the north, passes through ranch lands and the Pohakuloa Military Training Facility, for another 45 minutes, to the turn for Mauna Kea Access Road (John Burns Way). Nearby, Kipuka Huluhulu, or "shaggy hill", is a 20 minute hike to the top and back. From here it is a 30 minute drive to the Mauna Kea Visitor Information Center. The small village is home to scientists and astronomers that work in the observatories and an amazing place to learn what their research tells us about our universe. Returning to Hwy 200, drive 45 minutes to the amazing Kaumana Cave lava tube, a short hike and a wonderful exploration. A further 30 minutes down Hwy 200 brings one to downtown Hilo, where there are shops, restaurants, fine museums, gorgeous waterfront beach parks and a fabulous Farmers Market. From Hilo, it is approximately three hours to return to Kailua Kona over Hwy 200; alternately one can take the faster though less scenic Hwy 19 to Waimea and then Hwy 190 into Kailua Kona, about a 2 1/2 hour drive.
Leg 1) In Kailua Kona, start at Ahu'ena Heiau; take Palani Road east to Hwy 190; take Hwy 190 to jct with Hwy 200, The Saddle Road
Ahu'ena Heiau and Kamakahonu Beach
Centuries ago the inhabitants of this region built a series of sacred temples, or heiaus, which were originally used for the purpose of sacrificing human beings to their war god, Kuka'ilimoku. This particular archeological site is called Ahu'ena Heiau, which in Hawaiian means "Hill of Fire".
Built originally in the 15th century and rededicated by Kamehameha the Great in the early 1800s as the main temple of his capital, the current structures seen at Ahu'ena Heiau were re-built in 1975 under the auspices of the Bishop Museum with financial help from the Hotel King Kamehameha and are constructed to 1/3 the original scale. There are restrooms and showers located on the pier near the beach. Adjacent Old Kailua Town is a treasure of shops, restaurants and aloha.
Leg 2) Take Hwy 200, The Saddle Road, east to jct with John Burns Way (also called Mauna Kea Access Road).
Saddle Road
Crossing the spectacular saddle between the towering bulk of the volcanoes Mauna Kea and Mauna Loa at about 6600 feet, The Saddle Road runs through brush, grass and forest lands, over lava fields and through some of the wildest and most breath-taking scenery on the Island. From this roadway, four of the 5 principal volcanoes that form The Big Island may be seen: Hualalai, Kohala, Mauna Loa, and Mauna Kea. Because the western half of the road is in notoriously poor condition and consists, in reality, of only one operable lane for much of its descent from the saddle to the Mamalahoa Highway.
However, this road provides the only road access to the Mauna Kea Summit Area and Visitor Information Center, Mauna Kea State Park, Pohakuloa Training Area, Mauna Kea Astronomical Observatory Complex, Waikii Ranch and the Kilohana Girl Scout Camp. The Saddle Road also provides the only access to thousands of acres of public forest and open grass lands. Connecting Hilo from about milepost 7.8 on the Hawai'i Belt Road to the Mamalahoa Highway approximately 6 miles south of Waimea, the Saddle Road is widely used by island residents for cross-island travel, despite its somewhat poor condition and undeserved, evil reputation.
The Saddle Road frequently has perfect weather, but also fairly routine are patches of intense rain, fog and high winds. It's takes about 2 ½ to 3 hours straight driving time, depending upon weather, to make the full traverse from Kailua Kona to Hilo; however, one should be sure to leave time in the schedule to drive up to Mauna Kea Visitor Information Station or hike the Pu'u Huluhulu nature trails.
Along its entire 53 mile length between the turn-off from the highway just 6 miles west of Waimea and where it meets Hawaii Belt Road just north of Hilo, there is no gas and there are no services available; plan accordingly. Some food, water and restrooms may be available at the Mauna Kea Visitor Information Station which is a 30 minute drive up a side road off the Saddle Road about half way.
Leg 3) Off a Spur road at the jct of John Burns Way and Hwy 200, on the south side, is Kipuka Huluhulu ("Shaggy Hill") Nene Sanctuary.
Pu'u Huluhulu Nature Trails/Kipuka Aina Hou
Frequently described as simultaneously the most noticeable and the most overlooked landmark along the Saddle Road, Kipuka Pu'u Huluhulu rises more than 200 feet out of the surrounding lava flows. It's name meaning "furry hill", this forested cinder cone has multiple trails winding up through rare native koa trees to breathtaking 360° views of Hualalai, Mauna Kea and Mauna Loa at the top, where you can also wander a meadow of native Hawaiian plants recently reintroduced in this protected natural habitat. By whatever trail, the summit of Kipuka Huluhulu is only about 20 minutes walk from the car.
Owing to the encapsulated nature of the kipuka, bird watching here is particularly fabulous; the ÄEUR'akepa, Nene and the ÄEUR'akiapola ÄEUR'au, as well as the Kalij pheasants, pueo, i'o and turkeys are among the rare, endangered or just plain beautiful birds you will see here. The numerous roads and trails through the hundreds of square miles of adjacent lava flows makes for interesting, if hot and dry, mountain biking and hiking.
Parking and a unisex pit toilet are the only amenities available at Kipuka Pu'u Huluhulu.
Leg 4) Go north on John Burns Way to Mauna Kea Visitor Information Station.
Mauna Kea Visitor Information Station
The Visitor Information Station is open daily from 8 a.m. to 5 p.m. During the day there are interactive computer exhibits about Mauna Kea, the observatories and astronomical research, plus there are video presentations and nature trails to hike. Many evenings after dark National Park personnel and astronomers put on public programs and discuss what the latest astronomical findings tell us about the nature of our universe. The souvenir shop has some food items, including hot chocolate, coffee and hot soup, for sale.
Mauna Kea Summit
Before you decide to go to the summit of Mauna Kea, stop, think, plan. Are you prepared for cold and high altitude? Do you understand the nature and dangers of altitude sickness and UV radiation? Are you experienced at traveling icy dirt roads? Is you car safe for the trip (many car rental agencies on the island forbid you to drive this road)? The Rangers at the Visitor's center can brief you on altitude sickness, UV radiation preparedness, the condition of the road and all other information you need to decide whether to visit the summit.
The summit of Mauna Kea is truly an amazing place. Beautiful, awe-inspiring, 360 degree views of the entire Big Island, the summit is also culturally and religiously important to the native Hawai'ians and is home to several, world-class astronomical observatories and their support buildings. Because of the extremity of the altitude and the poor quality of the road above the Visitor's Center, it is advised that extreme caution be exercised in deciding to visit Mauna Kea's Summit. From the road's end very near the summit, a short, 10 minute trail leads up Pu'u Weiku cinder cone to the actual mountain top and a Hawaiian religious shrine. Also near the summit is the 1-mile hike to Lake Waiau, the 7th highest lake in the US, as well as numerous archeological sites. Moving at altitude is strenuous, so conserve energy. Do not over-tax yourself, be sure to drink plenty of fluids and protect yourself from the sun, wind and cold. Leave the summit area and return to the paved road long before you are tired.
Leg 6) Return John Burns Way to Hwy 200; take Hwy 200 east to Kaumana Caves
Kaumana Caves
A skylight opening to 25-mile long Kaumana Cave is located at the county park near the 4-mile marker on the Hilo side of the Saddle Road. Concrete stairs take you down through the rain forest jungle to the bottom of a collapse pit forming two entrances to the cave. Most people are drawn to the entrance on the right, a large, opening leading to cavernous rooms. In this entrance, graffiti from hundreds of years ago to the present is preserved, scratched into the rocks. The entrance on the left, however, is more interesting, leading through squeezes and low spots to numerous rooms with fascinating speleo-architecture and cave formations. Both caves go to true dark in fewer than 300 feet in either direction. There are more than 2 miles of easily accessible, wild cave to explore here, but if you intend more than just a cursory inspection near the entrances, bring a hard hat, water and at least 3 sources of light. A quick tour of the caves takes fewer than 20 minutes.
Parking for the caves is located across the highway from the park; extreme care should be taken when crossing he road. Public restrooms, water and picnic tables are available at the park. As you approach Hilo from Kaumana Caves, Hwy 200 becomes variously called Kaumana Drive, then Waianuenue Avenue.
Leg 7) Take Hwy 200 into Hilo Town.
Hilo Town
Beautiful but wet, metropolitan but decrepit, bustling but laid back, Hilo is a lovely, maddening, heartbreaking, addictive study in contrasts. In can rain all day long for 50 days in a row, yet when the sun does shine, the views of Mauna Loa and Mauna Kea from the Lilioukalani Gardens, or of Hilo Bay as you drive down from the mountains, or the rain-forest and waterfall choked gulches with lovely beaches along the highway north of town, make Hilo one of the most truly, achingly-lovely spots on earth.
More laid back and sleepier than bustling Kailua Kona, Hilo is the largest town on the island, and the county seat. The Imiloa Astronomy Center of Hawaii, Tsunami Museum, Lyman House Missionary Museum and the Panaewa Rainforest Zoo are all wonderful places to learn about various aspects of Hawaii. There are numerous shopping districts, two large malls and the Historic Old Hilo downtown shops to browse through, a variety of sprawling green parks, a fabulous tropical arboretum right downtown and a mile-long black-sand beach fronting the bay to explore. Hilo's Farmer's Market is a "must see" for any visitor who is spending time on this side of the island.
Leg 8) Return Waianuenue Avenue to Kaumana Drive to Hwy 200; take Hwy 200 west.
Coupon Bowflex Dumbbell Comparison Electronic Dart Scoreboards Frigidaire Affinity Problems Save
Best Buy Used Upright Piano Cheaper Timex Heart Rate Monitor T5g971
Buying Travelpro Expandable Rollaboard Tiger Print Leggings Buy Now
BestSkylights.com offers the best prices and availability on TL-12K - Solar Industries Skyview Tubelight Tubular Skylight Kits - 12 inch! Call 1-800-900-0759 for details!
Coupon Frigidaire Beverage Center Wholesale General Electric Appliances Shopping Dunlop Mcenroe
Cheep Mini Trampoline Workout Jason Palmer Buy Now Howard Leight Max Earplugs Coupon


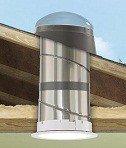
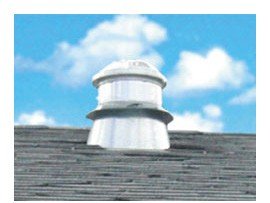
This item is Brand New in Factory-Sealed Box w/ 25yrs Warranty.SolarSkyLite is a 10" tubular skylight that will transform any dark space by filling it with beautiful, soft, evenly dispersed natural light. The 10" model illuminates up to 150 sq. ft. which is equal to about 300 watts of incandescent lighting!SolarSkylite has been designed with curb-appeal in mind. The low profile unit blends seamlessly into your roof line. Inside, the sleek Euro-styled light fixture matches any home decor.Installation is Quick and Simple.Installation takes approximately 2 hours. All components and hardware are included for a 48" high installation. To assist with installation, please view our easy-to-follow video online.Add light to any dark room.Natural, soft light- virtually no heat gain, no UV rays, no fading!Highly reflective light pipe which illuminated up to 150 sq. ft.-equivalent to 300 watts of incandescent lighting.Heavy duty aluminun parts that will not leak and needs no maintenance,Quick and simple installation10" kit includes 4" tube and all components and hardware needed.
Learning To Play Keyboard This Instant Wholesale Parchment Lampshades
Making DIY solar heating panels can be pretty simple, as long as you prepare the materials you need for the project. Anyone with average handyman skills should be able to easily complete the task, and special tools are not required.
All you need, in terms of equipment, are:
a wood saw a hacksaw a drill a screwdriver a hammer screws nails a file a paintbrush a tape measure
Materials you need to procure include the following:
a 10mm annealed copper tube a 16swg aluminum sheet glass fiber wool a marine-ply sheet 4mm glass timber for the frame
The copper tubes will be used to bring the water through the collector area. Copper has high thermal conductivity which makes it perfect for the job. It's available in most plumbers' shops, and comes in 20m, 25m, and 30m coils.
Once you've assembled the copper tubing, you'll need to attach it to the blackened absorber plate. It will collect the heat of the sun and transfer it to the copper tubing. It is recommended to use aluminum as an absorber plate because it is cheaper than copper sheets and it is more readily available in most locations.
The absorber plate will be encased in a wooden frame. It is made out of hardwood with a marine-ply backing sheet. If you want the frame to last longer, a preservative coating should be applied to it. This will add a couple of years of service.
The last part of the DIY solar heating panel is the transparent cover. This will prevent heat loss especially during cool weather. Glass is preferable because of its high light-transmission value. If you can't afford a float glass, acrylic sheeting is a suitable substitute. The bad side of using acrylic sheeting is that it is prone to scratching and discoloration.
The efficiency of DIY solar heating panels might not be as good as the efficiency of commercially available ones, but they can get good results. And think of the savings you'll get when you make one. A DIY solar heating panel costs a third the price of a commercial one. Not only that but you'll be cutting down your energy bill as well if you use it. If constructed right, the panel has a life expectancy of twenty years. There are no moving parts involved, and no maintenance should be required the panel.
Constructing DIY solar heating panels is not complicated and is one of the easier DIY solar power projects. This is one project that you should definitely try if you are interested in setting up DIY solar power equipment or systems. You can use the panel to heat your pool, or to supply your home with hot water.
Pulse Heart Rate Monitors Free Shipping Braun Shaver Series 7 This Instant

Rigid Sun Tunnel Extension TubeRigid extension tubes are available for rigid SUN TUNNEL skylights.For Use with TMR, TGR, TMF and TGF Sun Tunnel SkylightsCompatible Only with Skylight Models Produced After January 2010

Tubular skylights are highly innovative and energy efficient lighting systems. The capped cylindrical dome allows natural sunlight to enter a room through its highly reflective light pipe. The mirror-like light pipe allows the light to scatter 100% evenly. A tubular skylight minimizes space and in the end impact on your roof. It's engineered to be weather-tight and leak-proof. Why tubular instead of traditional skylights?The highly reflective mirror-like light pipe allows the tubular skylight to emit more light than traditional skylights. Tubular skylights are far more energy efficient than traditional skylights. Tubular skylights are designed with a sealed shaft that minimizes the transfer of heat or cold into your home. This is a great feature as traditional skylights usually generate heat. Tubular Skylights scatter 100% of the natural light spectrum through the use of a diffuser, thereby eliminating the spot light issue commonly found with the traditional system. 99% of the sun's harmful UV rays are absorbed by tubular light's specially designed dome, thus eliminating bleaching or discoloring effects on carpets or furniture. Installation is quick and easy, as tubular skylights can be installed in two hours or less. These lights require very little space for installation, they can be installed virtually anywhere! Best of all they are less expensive than traditional skylights.Why Natural Light Tubular Skylights? Natural Light uses the highest quality materials in the manufacturing process. The entire unit was designed around performance, ease of installation and being able to withstand the weathering effects of any environment. The warranty is the best in the industry, 25 years.
!8!# Discount Water Ionizers Comparison Brand New Reviews Digital Pianos !8!# Order Aed Powerheart
|
|
|
|
|
 |
 |
 |
 |
 |
 |
 |
 |